|
 3-Way High Efficiency Speaker
(Lavoce, Dynaudio, Foster 3-way. October-2023)
LCR MTM 3-Channel Speaker
(Three MTM Speakers in One. July-2023)
Mini7bt - A Minimus 7 Portable Bluetooth Speaker
(Minimus 7 and Dayton Audio. Spring-2022)
2-Way Ribbon Tweeter Speakers
(Vifa and Pioneer. May-2020)
Transmission Line Speakers
(Aborted attempt at a TL. September-2012)
Acoustic Research AR-4x Rehab
(Rehab of a garage sale find. January-2016)
Infinity RS-4000 Rehab
(Rehab of a garage sale find. June-2015)
Polaris
(A tall, thin, upwards firing omnidirectional speaker. May-2010)
Shiva_PR15
(A powered subwoofer using a 12" driver and 15" passive radiator. Jan-2010)
Can-Less
(A computer speaker; redux. December-2005)
Can-Can
(A computer speaker in a light canister. Jan-2005)
Sonosub
(10" vented subwoofer in a cardboard tube, powered by a Parapix amp. May-1999)
MTM Center Channel Speaker
(A Madisound design. Nov-1997)
2-way Surround Speakers
(5" woofer and 1" tweeter. July 1997)
3-piece mini system
(6" DVC bass module mated to 4" car speaker. June 1997)
3-way Vented Floorstanding Speaker
(vented 10" woofer, 5" mid and 1" tweeter in a 4
ft tower. Summer 1995)
NHT1259 Subwoofer
(A 12" woofer in a sealed architectural pedestal. Winter 1994-95)
Inexpensive Speaker Stands
(Particle board, sand and spray paint. Fall 1994)
2-way satellite
(6.5" woofer and 1" tweeter. Summer/Fall 1994)
| Audio Electronics Related Projects |
900 MHz Audio Receiver
(Better use for bad headphones. Jan-2008)
Buster - A Simple Guitar Amp
(Perfect for the beginner. Jan-2010)
A PC-based Audio Console
(Use a PC to play tunes. Jan-2010)
LM-12 Amp
(Bridged LM-12 opamps. Aug-2003)
CeeDeePee
(A CD player and FM tuner from spare computer parts. Oct-2002)
Quad 2000 4-Channel Amp
(Premade modules by Marantz. May-1998)
Zen Amp and Bride of Zen Preamp
(by Nelson Pass. Apr-1997)
Using Wood in Speakers FAQ
(Work in progress)
MDF FAQ for speaker builders
Woodworking Tools for the DYIer
(HomeTheaterHiFi.com Oct-1998)
Some Thoughts on Cabinet Finished for DIY Speakers
Large Grills Made Easy
Some Parts Suppliers
(Outdated)
DIY Audio Related URLs
Veneering Primer
(by Keith Lahteine)
How to get a Black Piano Finish
(by DYI Loudspeaker List members)
Sonotube FAQ
(by Gordon McGill)
Excerpts from the Bass List
(Oldies but Goodies)
DIY Loudspeaker List Archives
|
|
Large
Grills Made Easy
This page
describes how I made the large 11.75 X 43 inch grill for my
3-way vented speakers using my wife's idea of using screen
door retainer splines. The reason for making this a seperate
page is that I've found this mounting method to work equally
well on all grills sizes.
The grill
consists of a wooden frame with grill fabric stretched over
all four edges. One important goal in the finished grill is
to keep the fabric stretched evenly over the entire length
of the unit. In my case, this is 43 inches. Keeping consistent
tension on the fabric is a problem. Staples may be used but
they are difficult to drive into solid wood and they leave
loose fabric dangling. Hot melt glue requires quick placement
of the fabric which is diffcult when the fabric is long. Spray
adhesives or contact cement can come through the fabric's
weave.
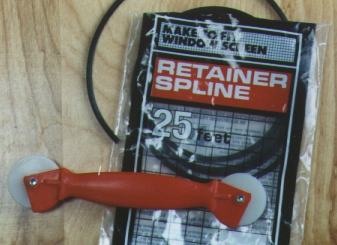 My wife's idea is to use the retainer spline found on aluminium
screen doors to hold the grill fabric in a groove on the inside
face of the frame. Splines are readily available in hardware
or home centers as are the insertion tools. Both are cheap
- less than $3 USD for 25 feet of spline and $5 of the tool.
My wife's idea is to use the retainer spline found on aluminium
screen doors to hold the grill fabric in a groove on the inside
face of the frame. Splines are readily available in hardware
or home centers as are the insertion tools. Both are cheap
- less than $3 USD for 25 feet of spline and $5 of the tool.
First, the
frame is assembled using dowels and glue, making sure the
frame is square by measuring the diagonals. Now cut the groove
on the back side of the frame using a table saw. The actual
size (width and depth) of the groove depends on the spline
used, so make some measurements first. On my table saw and
blade, the width of the groove I need is wider than one blade
kerf but smaller than 2 kerfs so I need to make 2 passes with
the kerfs overlapping each other. I run all four edges of
the frame through the table saw for a first pass. Note that
the depth is not as critical as the width - the depth needs
to be deep enough to completely hold the spline while the
width needs to hold the spline and fabric snugly. Run some
additional scrap pieces at this table saw setting. Now adjust
the table saw fence in very small increments to widen the
groove and cut a new groove on a scrap piece. Test each new
width by actually inserting some grill fabric and spline until
the right width is found. Once the width is determined, run
all four frame edges through the new blade setting.
Installing
the grill fabric is simple. The spline is inserted a few inches
at a time, and only as much fabric as necessary is stretched
at any one time. It's easy to make adjustments when needed.
And since nothing is permanent, it's always possible to start
over with different color grill material in case the room
decor is changed ! When everything is satisfactory, trim off
the excess fabric with a sharp knife and it's done.
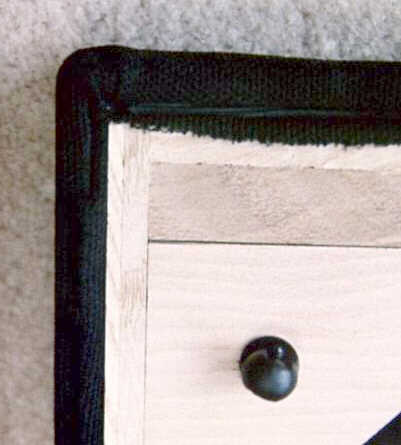 Here is the grill's upper left hand corner
viewed from the back of the grill. The spline is visible on
the upper edge of the frame. On the left edge, the trimmed
fabric curled over the spline and is thus not visible. Also
on the picture is a male grill connector mounted on a triangular
corner piece.
Here is the grill's upper left hand corner
viewed from the back of the grill. The spline is visible on
the upper edge of the frame. On the left edge, the trimmed
fabric curled over the spline and is thus not visible. Also
on the picture is a male grill connector mounted on a triangular
corner piece.
And if this
just doesn't work out, all is not lost as the frame is still
good for most other backup fastening methods :)
|
|
29-September-2000
Note: The
contents in these pages are provided without any guarantee,
written or implied. Readers are free to use them at their
own risk, for personal use only. No commercial use is allowed
without prior written consent from the author.
|
|
 |