|
 Matrix Clock
(A dot matrix clock and messaging center remotely programmable over Bluetooth Low Energy. January-2021)
Numitron Space Invader Alarm Clock
(A desktop alarm clock with Numitron tubes and 76477 sound chip. July-2020)
Another Analog Digital Clock
(A desktop analog meter clock with temperature and humidity using VU meters. April-2020)
An Analog Digital Clock
(A steampunk inspired digital clock with analog meter display. September-2017)
A Larger Battery For An Old UPS
(More power. November 2020)
Replacing the Battery in a Norelco Reflex Plus Razor
(New life for a great razor. May 2020)
Replacing the Battery in a Sonicare Toothbrush
(Don't throw out a perfectly good toothbrush. October 2010)
Replacing the Battery in a TI-59 calculator
(Reviving this classic calculator. December 2015)
|
|
An Improved TI-59 Calculator Battery
I recently came across an old Texas Instruments TI-59 calculator at a yard sale. It was connected to a PC-100C printer and was missing the key. I'm a big fan of these old TI calculators. Yes, they have their issues - including the dreaded buttons bounces. But this was a calculator I've always wanted back in the day. I once owned the TI-57 (original LED version); I really wanted a 58 or 59 but at the time, I just couldn't afford them. Now I had one with a printer for all of $1.
The original battery consists of three AA NiCd cells wired in series. Over time, these degrade, leak and generally make a mess of the pack. This one was no different. I toyed with the idea of replacing the bad cells with new ones and effectively rebuilding the battery pack. This had some drawbacks, namely:
- I don't have a portable TI-59 charger. I can use the one built into the printer but I want the option of not having that large paperweight lying about. Third party chargers are available but who knows if they match the original specs.
- I still have to rebuild the pack which is no easy task. Removing the old batteries is bound to cause some damage to the plastic shell. I don't have a welder so I would have to use NiCd cells with built-in tabs and that adds bulk to a pack already tight on space.
- It's better to charge cells individually. A three cell pack would treat the entire unit as one. I already have a high performance Maha/Powerex charger; why use almost-40 yr old charging technology?
Somewhere I read a blurb about replacing the three AA cells with three smaller AAA cells (sorry I forgot where I read this to give proper credit). I decided this was the best way for me to go. I would house the three AAA cells in their own holder to allow easy removal for charging. Below are pictures of my rebuilt battery pack loaded with three low-self-discharge Eneloop NiMH cells.
|
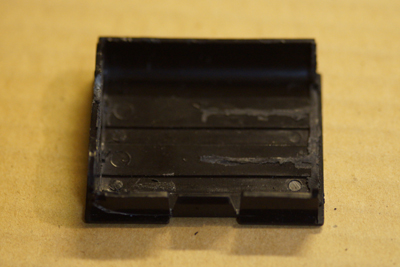 |
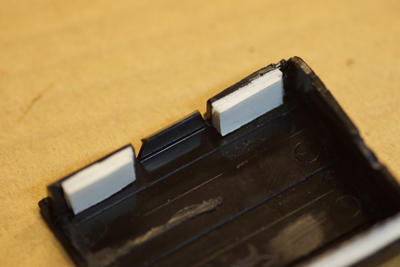
First I had to remove the old AA cells. I lightly damaged the plastic housing (see crack on lower left of picture) but a little glue on the inside restored it structurally.
Next came the Dremel. I removed one side wall as well as small ribs. The finished pack is a tight fit and would fit better if the other wall was also removed; but I kept one side wall for structural strength. |
 |
Here's your basic three AAA cell battery holder. I got mine from Parts Express but you can get one from any electronic supply house. Here I inserted three generic batteries to check for size. Checking now prevents potential problems later! |
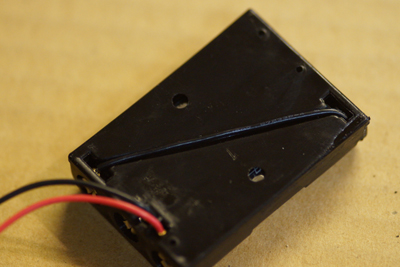 |
This particular holder has a wire that runs diagonally across the back inside a shallow groove. This means the rear face is not perfectly flat. It's not a big deal. |
 |
The AAA cell pack is narrower than the opening in the plastic housing. I used two layers of double sided sticky foam plus one thin layer of black plastic on this side to reduce the width and achieve a tight fit.
|
 |
Here's a view of the other side with two layers of double stick foam. |
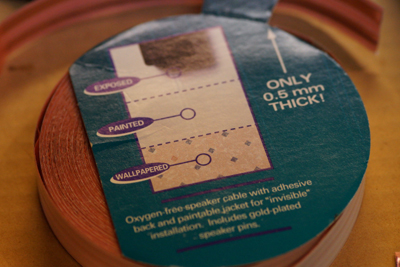 |
Now the fun part. The battery pack needs to have two contacts strips to mate with corresponding contacts on the calculator's interior. To make these, I used some speaker "wire" I had lying about. These wires are flat cables originally sold as architectural wires. They come in a role and have an adhesive side that can be pressed onto a wall. The other side is paintable to effectively hide the wire. Pretty cool. |
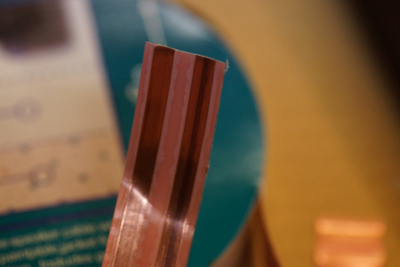 |
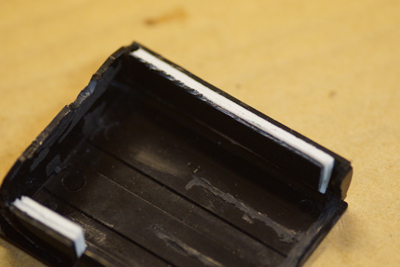
Here's a close-up view of the speaker wires. I cut a short strip, separated the two wires, peeled the adhesive cover and stuck the wire onto the back of the AAA pack. I then remove the backing on the other side of the wire to expose the metal. |
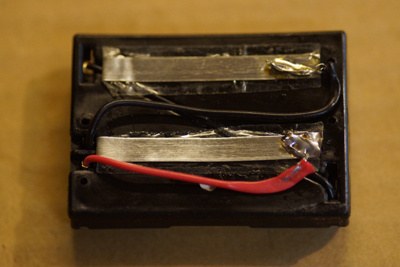 |
A little careful measuring is required to get the metal strips in the right place. I ran the wires from the AAA pack to the metal strips and soldered them into place. No, the soldering is not a thing of beauty! I was going to go back and clean it up; but since it works, why tempt fate?
By the way, the reason I ran the wires to the right side instead of the shorter left side is purely to give me a Plan B. To solder the wires to the left side, I would have to trim almost all of the wire, leaving me with almost nothing to work with in case of problems. |
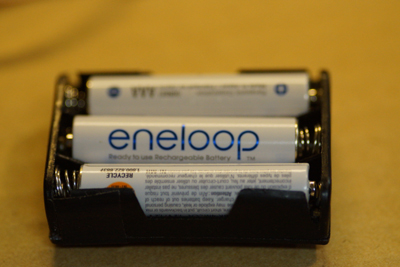 |
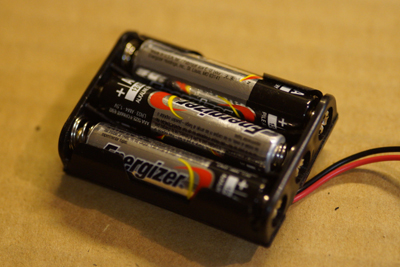
With the pack done, I loaded the eneloop batteries and it's show time. The Panasonic (previously Sanyo) Eneloop 750 mAh batteries are low-self-discharge cells. Unlike regular NiMH cells, these discharge very slowly when left unused. Like NiCd they are rated at 1.2V so they make a great replacedment anywhere NiCd are used. I bought a 4-pack from Amazon for under $10.
Note that unlike the original pack, the metal contacts are on the back side of the unit. This allows me to remove the cells easily - to charge or to replace.
|
 |
Finally the AAA pack is placed inside the original plastic housing. I did not attach (glue, tape, etc) the two; there's no need to. A piece of electrical tape covers the solder joints. |
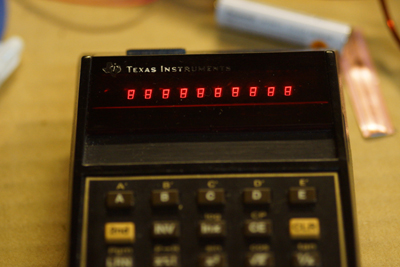 |
It's alive! |
|
|
18-December-2015
Note: The
contents in these pages are provided without any guarantee,
written or implied. Readers are free to use them at their
own risk, for personal use only. No commercial use is allowed
without prior written consent from the author.
|
|
 |