|
Bench in Ash
This page
contains the description of a 5 foot bench I built in October
1997. The goal was to build a bench that would fit adjacent
a 5 foot kitchen table using available materials. The lumber
I had on hand consisted mainly of two pieces of 6/4 ash, each
roughly 12 inches wide and 6 feet long. I also had some odds
and ends pieces of ash which I hoped would be enough to complete
the project.
The basic
dimensions were defined by the lumber stock on hand - the
bench top is 58 x 11 x 5/4 inches, which is a little narrower
than I would have liked it to be. Luckily, this bench is used
primarily by children, so the 11 inch width is not really
an issue (yet). The overall height is 17-1/4 inches, which
is comparable to a typical dining room chair. Note that care
should be taken not to tip the bench over. At 11 inches in
width, the bench is narrower than a typical chair is deep,
yet equal in height. This makes it potentially more unstable.
Of course the 11 inch width is a restriction for me; a wider
seat is recommended for those building something similar.
Also note that the finished unit is quite heavy due to the
dense wood used and subsequently more stable than I had initially
feared.
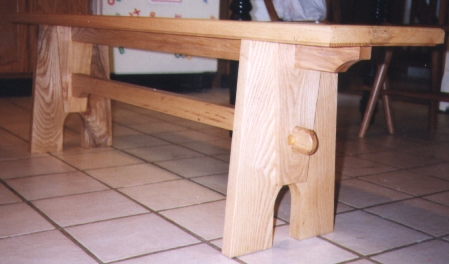
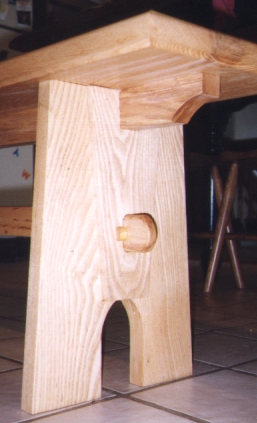
Here are three pictures of the bench.
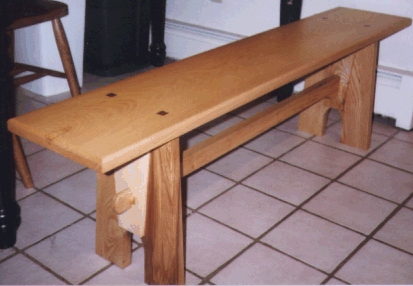
First a
note on the color of the wood. Several different pieces of
ash were used to make this bench, leading to variations in
wood color. There is quite a drastic difference between the
lightest and darkest color. No stain was used so that only
the natural color of the wood shows.
The middle picture shows
that there are four basic parts to the bench - the top, the
two legs and a lower stretcher. The top was made from one
of the original 6 ft x 12 inch boards, and the legs and beams
were cut from the other board.
Top
The top
has two parts - a flat sitting surface and a reinforcement
beam. The top has a 1/4 inch round over on the top and a 1/4
inch cove on the underside. The cove gives it a slimmer look.
The reinforcement beam is 2 inches shorter than the top on
each end and is notched to hold the two legs (see bottom picture).
Its ends are also curved for an added decorative look. The
beam is attached to the top from the bottom at three points
- in the middle and in the leg notches. Each of the three
screws is recessed. The legs cover two of the screws and the
middle screwhole is capped with an ash plug.
Legs
Each leg
is made from three parts - a middle 2 inch thick part and
two outer 1-1/8 inch thick legs. The three pieces are glued
together to form each leg with the outer legs actually dadoed
into the middle piece's sides. Three seperate pieces were
used due to available materials. This can be easily modified
to suit individual resource restrictions. The top of each
leg assembly is notched to fit the top reinforcement beam.
To accommodate the stretcher tenon, a 3/4 x 2 inch hole was
bored 7-1/2 inch from the bottom.
Stretcher
The lower
stretcher serves to prevent raking of the unit and helps lower
the center of gravity for added stability. It is 3 x 1-1/8
x 38 (the 38 inches is implementation dependent) and is thinner
in the middle for looks (see middle picture). The through tenons are
4 inches long and rounded at the ends for safety and looks
(see bottom picture). To lock the tenon to the legs, half of a 3/4
inch dowel is glued in place. A 3/4 inch hole is drilled in
the tenon at just the right spot so that only a semi-circle
is exposed on the exit side of the tenon. The half-dowel is
then sized to fit the opening (see bottom picture).
Assembly
Connect
the stretcher to the legs and lock it in place with the half-dowel.
Add the top by matching the leg and top notches. To fasten
the legs to the top, I drilled four holes from the top of
the seat (see top picture), two holes per leg. Each hole houses
a recessed lag bolt that screws into the top of a leg. Each
hole is squared and a piece of black walnut is used to cap
the opening (see top picture). Black walnut is used for color contrast.
Finish
The finish
is Danish oil (Natural) and polyurethane for added moisture
and wear protection (from kids !). Be sure to adequately protect
the leg bottoms so that liquid spills do not absorb easily
into the legs.
Summary
This bench
was really easy to build. It is also, IMHO, quite elegant
and well proportioned. The reinforcement beam creates a very
sturdy top that barely flexes when supporting large adult loads.
The lower stretcher performs very well in preventing raking.
|