|
CD Storage Chest
The
basic problem was simple - I needed a rack to hold my growing
CD collection. The real problem was that I didn't like any
of the typical CD holders I saw in stores. The vast majority
of them had two things in common - (1) they tended to be tall,
shallow and thus unstable, (2) they held the CD on-edge so
that all that could be seen is that narrow strip of text on
the spine of the plastic jewel case. I wanted something sturdy
enough to stand on its own without fear of toppling over due
to an accidental bump and I like seeing the covers.
As
it turns out, solving the latter problem also takes care of
the former. To see the CD covers, I decided to use flip-style
CD holders. These are available from many hobby and woodworking
suppliers. The ones I used hold 20 CDs and measure about 14
inches in length. That length, combined with the rest of the
structure guaranteed an overall heft large enough to be extremely
stable.
Below
is a brief description of the unit as I built it. The only
pictures I have were taken after the unit was completed so
there are no pictures of intermediate construction steps.
The unit itself is scalable - both in terms of capacity and
in terms of construction quality and appearance. More on this
later. I won't provide step-by-step instructions on making
one of these units. Instead I'll provide information on what
I did to get the end product. This should allow anyone to
adapt the design to fit individual needs. All measurements
are approximate as everything is ultimately made to fit, not
to some preconceived measurement.
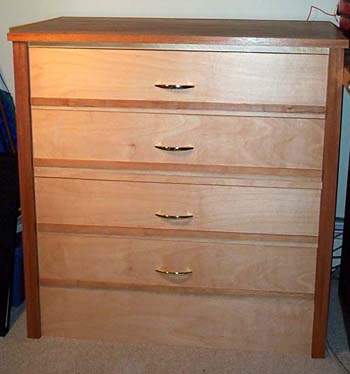
Overall
Dimensions - Approximately 33-1/2 inches wide (including
overhang of top), 18-1/4 inches deep (including overhang of
top), 34-1/4 inches tall.
Basic
Materials - Low cost is good. The bulk of the unit is
made from one 4ft x 8ft x 3/4 inch sheet of furniture grade
oak plywood. This sheet was ripped to form four drawers bottoms,
four drawer fronts and two side panels. The rear is made from
two 2ft x 4ft sheets of 1/16 inch of hardboard
(my local Home
Depot didn't have 4x4 sheets and 2 smaller sheets were
easier to carry in my car). The top is two laminated sheets
- 1/2 inch furniture grade oak plywood and 3/8 inch furniture
grade cherry veneered plywood. Both are leftovers from other
projects. The rest of the visible wood is random leftover
cherry and mahogany.
Using
furniture grade veneered plywood greatly simplified the overall
construction - the veneer looks great and I didn't have to
worry about wood movement (from environmental changes) on
the side panels.
The
Drawers - The drawers are the heard of the unit so they
were designed first. Everything else simply wraps the drawers.
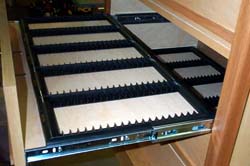
 The unit has four drawers, each holds 5 flip style trays of 20
CDs each. The overall capacity is 400 CDs (100 per drawer). Each drawer
sits on full-extension slides.
This is important - you want to be able to reach the very
last CD and regular 3/4 extension drawers won't let you do
that unless you give each drawer lots of extra height clearance
for your hand to reach the rear. I bought my drawer slides
from Woodworker's
Hardware.
The unit has four drawers, each holds 5 flip style trays of 20
CDs each. The overall capacity is 400 CDs (100 per drawer). Each drawer
sits on full-extension slides.
This is important - you want to be able to reach the very
last CD and regular 3/4 extension drawers won't let you do
that unless you give each drawer lots of extra height clearance
for your hand to reach the rear. I bought my drawer slides
from Woodworker's
Hardware.
 Each drawer is entirely open except for the front. There are no
sides or back. I did this purely for construction simplicity.
The drawer slides are screwed directly into the 3/4 inch drawer
bottom's (plywood) edges. The drawer front is also made from
the same 3/4 inch plywood and is screwed into place from the
front with 3 screws. The screws are then covered with a strip
of cherry acting as an accent piece. Since the drawer pull
sits about 2 inches above the drawer bottom I added two metal
"L" brackets on the drawer's inside to prevent torque
on the drawer pulls from ripping the drawer fronts off. This
is especially important since most drawer slides have a notch
in the closed position that requires an extra tug to open.
The "L" bracker is a 1 inch x 1/2 inch unit from
the local ACE
Hardware store. Aside from stiffening the drawer front,
it also helps align the front to be perpendicular to the drawer
bottom. The
drawer pulls were a clearance item from
Lowe's.
Each drawer is entirely open except for the front. There are no
sides or back. I did this purely for construction simplicity.
The drawer slides are screwed directly into the 3/4 inch drawer
bottom's (plywood) edges. The drawer front is also made from
the same 3/4 inch plywood and is screwed into place from the
front with 3 screws. The screws are then covered with a strip
of cherry acting as an accent piece. Since the drawer pull
sits about 2 inches above the drawer bottom I added two metal
"L" brackets on the drawer's inside to prevent torque
on the drawer pulls from ripping the drawer fronts off. This
is especially important since most drawer slides have a notch
in the closed position that requires an extra tug to open.
The "L" bracker is a 1 inch x 1/2 inch unit from
the local ACE
Hardware store. Aside from stiffening the drawer front,
it also helps align the front to be perpendicular to the drawer
bottom. The
drawer pulls were a clearance item from
Lowe's.
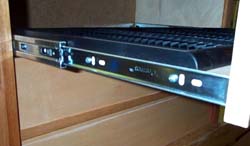
The
drawer front is 30 inches wide 6-3/8 inches high. Each slide
is 1/2 inch deep so the drawer bottom is 29 inches wide and
15-1/2 inches deep. This depth was chosen based on (1) the
16 inch length of the slides and (2) the 14 inch length of
the CD tray. Note that the drawer front extends below the
drawer bottom by about 1/2 inch. This was done to guarantee
that the slides would clear the top of the next lower drawer
(the slides are taller than the 3/4 inch thickness of the
drawer bottom). This may seem confusing until you hold an
actual full extension side and fully extend it. The height
above the drawer bottom is about 5-1/4 inches which is enough
for the CD and CD tray.
Each
drawer front has iron-on veneer applied to the top and sides
to cover the exposed plywood edges.
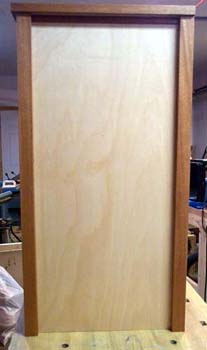
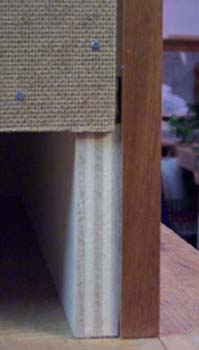 Side Panels
- The sides are about as simple as can be.
Each is a single sheet of 3/4 inch plywood extending from
top to bottom. The four corners are trimmed with 3/4 inch
mahogany to give the apperance of "legs" and to
hide the exposed plywood ends. The picture from the rear
shows the applique.
Side Panels
- The sides are about as simple as can be.
Each is a single sheet of 3/4 inch plywood extending from
top to bottom. The four corners are trimmed with 3/4 inch
mahogany to give the apperance of "legs" and to
hide the exposed plywood ends. The picture from the rear
shows the applique.
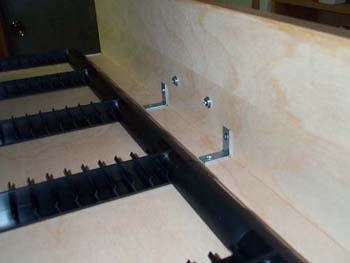
Bracing
and Stability - Since all the weight rests on the sides
via the drawer slides, it's important that the side panels
transfer the load straight down and not wobble side to side.
On the front, the two side panels are held in place by 3/4
inch (plywood) beams at the top and middle and a 6 inch kickboard
at the bottom. I decided against recessing the kickboard since
that would only complicate the construction of the side panels.
The rear has the same side-to-side beams at the top and middle.
The bottom is a little different - there is a small shelf
that keep the side panels from twisting. At the top, the top
panel acts to prevent this twisting motion.
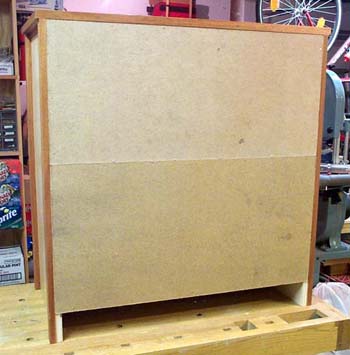 Back - The back is extremely simple. Here is a view.
Two pieces of 1/16 inch thick hardboard span almost the entire
space. No rabbets were cut to hide the hardboard; rather the
side panel applique simply covered the hardboard edges. The
two pieces meet at the middle rear beam.
Back - The back is extremely simple. Here is a view.
Two pieces of 1/16 inch thick hardboard span almost the entire
space. No rabbets were cut to hide the hardboard; rather the
side panel applique simply covered the hardboard edges. The
two pieces meet at the middle rear beam.
|
 Top - Admitedly the top was always an after-thought. I really
didn't know what I would do until I had run out of other things
to do on the project. I decided that I wanted to place some
audio equipment on top of the unit. This meant the top had
to be strong enough not to deflect too much with added weight.
Holding stuff serves another purpose - it adds mass to keep
the unit from tipping forward should all drawers be opened
at once ! (I actually don't know if this will happen on my
unit and I don't really want to try it !).
Top - Admitedly the top was always an after-thought. I really
didn't know what I would do until I had run out of other things
to do on the project. I decided that I wanted to place some
audio equipment on top of the unit. This meant the top had
to be strong enough not to deflect too much with added weight.
Holding stuff serves another purpose - it adds mass to keep
the unit from tipping forward should all drawers be opened
at once ! (I actually don't know if this will happen on my
unit and I don't really want to try it !).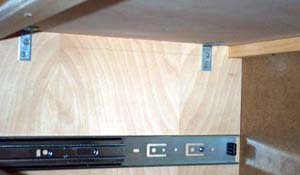 One important requirement for any top is that it be able to support
the weight of the unit when transporting it. I used four 1-1/2
inch x 1/2 inch "L" brackets to secure the top of
the side panels.
One important requirement for any top is that it be able to support
the weight of the unit when transporting it. I used four 1-1/2
inch x 1/2 inch "L" brackets to secure the top of
the side panels.