|
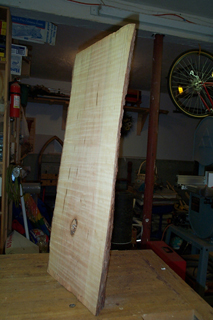
Bench/table in Cherry

Several
years ago, a winter ice storm toppled half of an old cherry
tree in our back yard. My neighbor came over with his chainsaw
and converted the bulk of the tree into firewood for his wood
stove. I kept a chunk of the bottom of the tree.
The slab
sat in my garage for years, slowly cracking and checking.
Truth be told I had no plans for the wood and kept it mainly
in the hopes that I might get a Eureka! moment someday. I
can't say the moment ever really came. I thought of things
I needed around the house - maybe a new rack for the stereo
? maybe a chair ? Over time, I decided that the best thing
to do was to further reduce the chunk of wood into a workable
shape. From there I could get a better "view" of
the piece and finally make something.

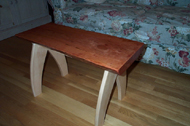
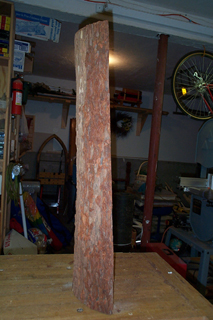
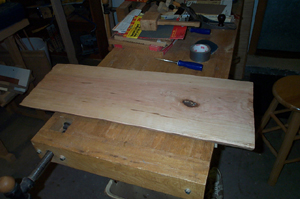
(The upper part of the chunk is in the middle.
The slab on the right is the eventual bench/table)
Unfortunately,
I can't find pictures of the original chunk of wood. Let's
just say that it was large and bulky. I cut the chunk into
two pieces - a lower and upper part. The lower part is still
sitting in my garage and will likely end up as firewood this
winter. The upper part became this bench/table.
The eventual
idea was to flatten it and make a combination bench/table;
something portable and useable for just about anything that
requires a small surface off the floor. I set the height of
the finished item at 18 inches - the height for a typical
chair, and just a tad under the height of a coffee table or
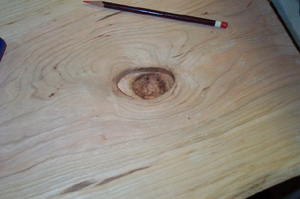
endtable. The slab is partly heartwood on one side (down the
center) and entirely sapwood on the other. This didn't make
for the finest looking chery but the fun part of this project
was in making something out of nothing and that's rewarding
enough. But first, I had to plane the slab down.
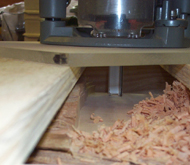
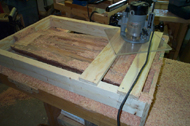
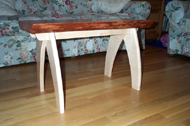
(The router
and frame used to surface the irregularly shaped slab of cherry)
To surface
the slab I used a router and a straight cutting bit. I built
a frame around the slab, mounted the slab to the frame, shimmed
it to the desired height and ran the router across the top
side until the surface was decently flat. I then flipped the
unit over and repeated the process on the other side. The
final thickness of the slab was just under 2 inches.
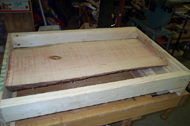
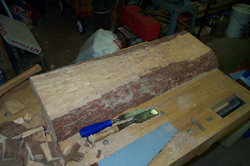
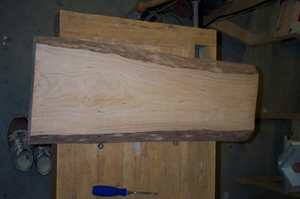
(The two sides of the slab after
routing the top side)
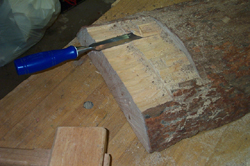
(To ease the load
on the router, the bulk of the underside was removed by hand
with a sharp chisel)
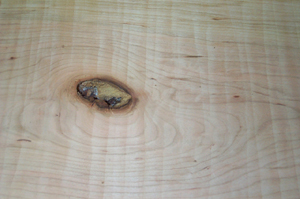
Routing
the top side revealed a rotted knot that I had to take care
of later. The bark on the two long sides was removed with
a chisel and some sandpaper. The two short ends were roughly
squared on a table saw to remove the ends that had screw holes
(from mounting in the router surfacing frame). Next came further
smoothing of the surface with various hand planes, followed
with sanding with 60 grit sandpaper. At this point I had to
consider what the rest of the supporting legs/structure would
look like and how everything would be fastened together.
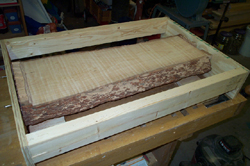
(Top and bottom of the slab
after hand planning, before final sanding)
Since the
project is about of recycling lumber, I opted to use only
lumber I already had. I didn't have much cherry so the legs
had to be made from something else. I had some 4/4 maple (planned
to about 31/32) and the contrast of dark cherry to light maple
made it a reasonable choice. Designing the legs took a considerable
amount of time. The slab measured rougly 30 x 13 inches; large
enough to be stable as a small bench. I needed legs sturdy
enough to hold the weight of two people without being so bulky
that they would overpower the slab in terms of appearance.
My stock of maple also limited the width of whatever I made
to about 7 inches !
Another
consideration for the legs is how they would be attached to
the slab. I wanted the legs to be a standalone item; literally
capable of standing on its own. In theory, the legs would
be able to support any slab of similar size; not just this
one. Making self-standing legs allowed me to work on both
pieces (leg assembly and table top) at the same time and ultimately,
allow me to apply the finish seperately and more easily.
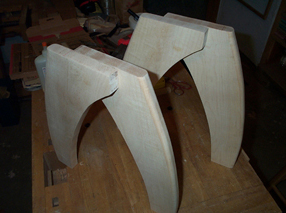
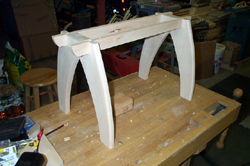
The leg
design I came up with consists of four seperate legs arranged
in two pairs. For each pair, the two legs overlap one another
to provide strength and added width. The final width at the
bottom of each leg pair is about 15 inches - wider than the
slab's width - thus giving the unit added stability. Overlapping
the legs solved the problem of using only a 7 inch wide piece
of maple but it also meant the legs would not be evenly spaced
on the slab. To fix that, I angled the leg pairs relative
to the center line of the slab. If you drew a line from the
center of each foot (1/'2 inch from the outside edge of each
foot) to the opposite foot in the pair, you'll find this line
to be perpendicular to the centerline. To connect the two
leg pairs and to reinforce the entire structure from raking
forces, I used two stretchers that span the top of both leg
pairs. These also serve as the mounting points for the slab.
Their placement is such that they hide the ends of the overlaping
region. The result is a bit of an optical illusion. When viewed
from various angles, some of the legs seem as if they are
not perpendicular to the ground (due to the arch and the offset
placement). Viewed from the side, the angled legs always appear
the same regardless of which side you look from. All of this
may not make any sense so please look at the pictures !
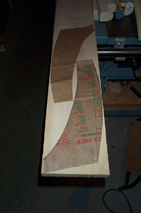

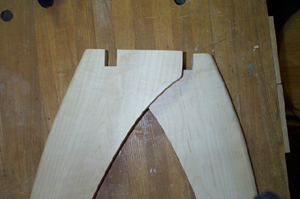
(Template, individual
legs and assembled leg pairings)
I made a
leg template on a brown paper grocery bag. This made two identical
legs which I then traced on the maple stock. By angling the
legs, I was able to get more than the 7 inches of width I
was limited to. The legs were cut out on a bandsaw and sanded
smooth by hand. The outside edge was fed through a 1/4 inch
roundover bit in a router table. A "good" and "bad"
side for each legs was selected; and the "bad" side
became the inside surface of the leg pairs. Each pair was
glued and then screwed together at two points. The screws
were recessed and capped with a maple plug.

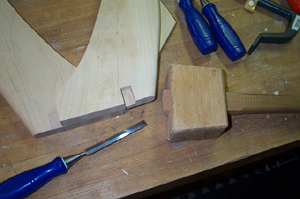
(Cutting
and chiseling the notches on the legs. Matching notches on
the stretchers)
The stretchers
are about 27 x 1-1/2 x 3/4 inches thick. Overlapping notches
were cut by hand and finished with a chisel at a 4 degree
angle. This compensates for the tilt in the legs. The ends
of each stretcher is curved upwards to complete the look.
Because of the overlapping legs, the distance from leg to
the end of each stretcher is different for each stretcher
pair at each end.
(Various stages
of repair on the rotted knot.
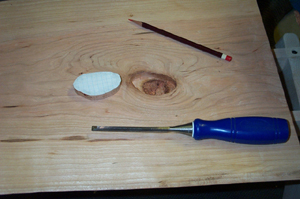
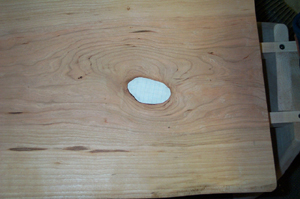
At this
point, the slab still has a hole on its top side. I used my
Dremel as a router and squared off the wall of the hole. I
traced the shape of the opening onto a piece of paper with
a pencil and glued the paper to some scrap cherry whose thickness
would make it fit just about right. Through lots of trial
and error, this cherry plug was shapped on the bandsaw until
it fit snugly into the hole. The paper on the plug was then
removed with a hand plane. I then sanded the four leg parts
(two stretchers and two leg pairs) and the top slab in grit
increments up to 400 grit. I also drilled four recessed mounting
holes on a drill press (it would be almost impossible to do
this on the press after assembly). The slab received a coating
of chery colored Watco Danish oil to better color match the
sapwood with the heartwood. This also helped colormatch the
chery plug with the rest of the slab. The legs did not get
any oil.
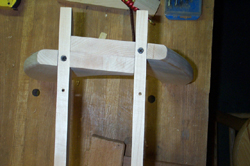
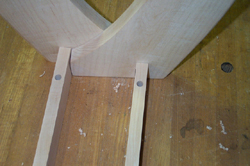
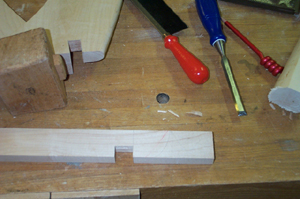
(Leg assembly
screws, pre-drilled mounting holes for the slab top, and completed
leg assembly without finish)
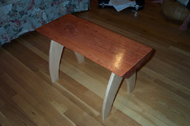
Once assembled,
the legs were held in place by 4 screws; one at each intersection
of a stretcher and leg. The resulting structure is very strong
and stable. Next came many coats of a semi-gloss water-based
polyurethane. Extra poly was applied to the most exposed areas
like the arched legs and top of the slab. Final assembly required
just four screws in the pre-drilled holes of the stretchers.
I let the unit cure for about 4 days before letting the kids
loose on it.
|