|
The first step in the design process was to build a model
of the entire unit. Above are four views of the popsicle stick
mock-up. Full blue colored sticks are 1x6 beams; partially
blue colored sticks are 1x4. The posts are 4x4. Notice that
the lowest bunk is very close to the floor to maximize useable
headroom. In this arrangement, the two lower bunks have the
benefit of added headroom (over a conventional triple-stacked
bunk bed) while sacrificing foot-room (assuming you sleep
as intended in the space). The top bunk is lower than a conventional
triple bunk so it too gets more headroom. The final triple
bunk differs slightly from the model in the placement of the
top bunk railings.
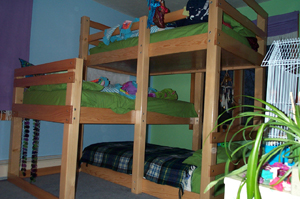
 These two
pictures show the completed bed. Construction is extremely
simple - everything is made from douglas fir and bolted into
place at half-lapped joints. Nuts are recessed in countersunk
holes. The difficult part is marking all the cuts in the right
places before making the very first cut. Once all the pieces
are milled, they are sanded and urethaned. Cleats run along
the edges of each level to support a piece of plywood which
in turn supports the mattress. Part of the top bunk railing
has since been cut off to make it easier to climb to the top
via the middle bunk.
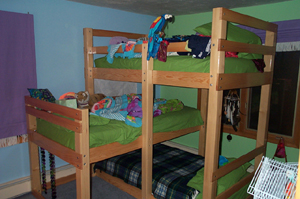
These two
pictures show the completed bed. Construction is extremely
simple - everything is made from douglas fir and bolted into
place at half-lapped joints. Nuts are recessed in countersunk
holes. The difficult part is marking all the cuts in the right
places before making the very first cut. Once all the pieces
are milled, they are sanded and urethaned. Cleats run along
the edges of each level to support a piece of plywood which
in turn supports the mattress. Part of the top bunk railing
has since been cut off to make it easier to climb to the top
via the middle bunk.
The final
results worked surprisingly well. The bolted design is extremely
strong, yet inexpensive. Best of all, everyone enjoys climbing
in and out of the beds!
Update - 5 October 2005
I received some
email recently asking for more measurements of the bed. Here's some
additional info. Hopefully it's enough to help those who are interested in
making a similar piece.
Each bed layer consists of a 1x6 (3/4 x 5.5) piece of douglas fir
on all four sides. On the inside of this rectangle are a set of
(roughly) 1x1 cleats (actual size is not all that important). The
cleats are glued and screwed on the inside bottom of the 1x6 railing. A piece of
3/4 inch plywood sits on these cleats and supports the mattress.
The plywood is 39.5 x 76. We used furniture grade plywood and urethaned
both side to avoid splinters. Mattress size is "twin".
What the above gives you is a railing that extends about 3.5+ inches
above the plywood. Your mattress will
extend above the top edge of the railing.
The bottom-most bed is almost directly on the ground. I think we left
a little gap at the bottom just in case the floor wasn't flat. Of course
that also invited "stuff" (papers ?) from getting lost under the bed.
On carpeting it's not as big a deal.
The middle bed is placed such that the bottom of the rail is 27 inches
above the ground. The top bed has its rail bottom 54 inches from
the bottom. Remember that these measurements are taken from the bottom
of the rail. The ceiling in the room is 91 inches high. You can make
adjustments to suit your needs. We didn't simply divide the height
into 3 because the bottom 2 beds have the effective headroom
of 2 bed spaces.
The taller bed posts are 80 inches tall. This gives enough extension
above the top mattress for safety. One post was later cut down to make
getting in and out easier; you can play with that as you see fit.
The 2 short posts that are only used by the middle bed are 48 inches.
You'll want to adjust these heights if you make changes to the basic
partitioning of the space.
If you look
at the pictures, you'll note that the horizontal rails are
rabbetted into the vertical posts. Getting these just right
is the most difficult part of the project. My memory fails
me here but I believe every post is different and most have
rabbets cut on two adjacent sides. You can avoid this headache
by surface mounting the rails. Not only do you save the time
and care needed to cut the rabbets but you can actually assemble
the bed as you mill your stock - build to fit. Of course you
may want to apply the finish to each piece seperately (disassembled).
|