|
 3-Way High Efficiency Speaker
(Lavoce, Dynaudio, Foster 3-way. October-2023)
LCR MTM 3-Channel Speaker
(Three MTM Speakers in One. July-2023)
Mini7bt - A Minimus 7 Portable Bluetooth Speaker
(Minimus 7 and Dayton Audio. Spring-2022)
2-Way Ribbon Tweeter Speakers
(Vifa and Pioneer. May-2020)
Transmission Line Speakers
(Aborted attempt at a TL. September-2012)
Acoustic Research AR-4x Rehab
(Rehab of a garage sale find. January-2016)
Infinity RS-4000 Rehab
(Rehab of a garage sale find. June-2015)
Polaris
(A tall, thin, upwards firing omnidirectional speaker. May-2010)
Shiva_PR15
(A powered subwoofer using a 12" driver and 15" passive radiator. Jan-2010)
Can-Less
(A computer speaker; redux. December-2005)
Can-Can
(A computer speaker in a light canister. Jan-2005)
Sonosub
(10" vented subwoofer in a cardboard tube, powered by a Parapix amp. May-1999)
MTM Center Channel Speaker
(A Madisound design. Nov-1997)
2-way Surround Speakers
(5" woofer and 1" tweeter. July 1997)
3-piece mini system
(6" DVC bass module mated to 4" car speaker. June 1997)
3-way Vented Floorstanding Speaker
(vented 10" woofer, 5" mid and 1" tweeter in a 4
ft tower. Summer 1995)
NHT1259 Subwoofer
(A 12" woofer in a sealed architectural pedestal. Winter 1994-95)
Inexpensive Speaker Stands
(Particle board, sand and spray paint. Fall 1994)
2-way satellite
(6.5" woofer and 1" tweeter. Summer/Fall 1994)
| Audio Electronics Related Projects |
900 MHz Audio Receiver
(Better use for bad headphones. Jan-2008)
Buster - A Simple Guitar Amp
(Perfect for the beginner. Jan-2010)
A PC-based Audio Console
(Use a PC to play tunes. Jan-2010)
LM-12 Amp
(Bridged LM-12 opamps. Aug-2003)
CeeDeePee
(A CD player and FM tuner from spare computer parts. Oct-2002)
Quad 2000 4-Channel Amp
(Premade modules by Marantz. May-1998)
Zen Amp and Bride of Zen Preamp
(by Nelson Pass. Apr-1997)
Using Wood in Speakers FAQ
(Work in progress)
MDF FAQ for speaker builders
Woodworking Tools for the DYIer
(HomeTheaterHiFi.com Oct-1998)
Some Thoughts on Cabinet Finished for DIY Speakers
Large Grills Made Easy
Some Parts Suppliers
(Outdated)
DIY Audio Related URLs
Veneering Primer
(by Keith Lahteine)
How to get a Black Piano Finish
(by DYI Loudspeaker List members)
Sonotube FAQ
(by Gordon McGill)
Excerpts from the Bass List
(Oldies but Goodies)
DIY Loudspeaker List Archives
|
|
2-Way
Surround Speakers
Introduction
The motivation
for this project had nothing to do with home theater (since
I don't have any such hardware); it had everything to do with
cleaning out my garage of spare building materials ! In addition,
I wanted to do some more veneering so that I could try some
different techniques and products.
The purist
would claim that all speakers in a home theater system should
use the same drivers to obtain matched timbre. While this
is a lofty goal, the practical part of me said that I wanted
to build these speakers at an absolute minimum cost, below
even that which I spent on my main
2-way satellites. The simple fact of the matter is that
this project is an experiment first, and a real speaker second.
That's the mentality at the onset - low cost, use up leftover
building materials, learn more about building speakers and
veneering. Secondary goals were to match the original satellites
as closely as possible, when possible.
The drivers
I started
searching for a low cost woofer capable of an F3 of no higher
than 100 Hz in a reasonably small box. (Yes I realize
Dolby
Digital calls for full range speakers all around, but
there's just no way that'll ever pass the SAF test :) My search
ended at the Madisound
web page where they had the Vifa
C-13SG-15 for $12.00 USD each. This is a semi-shielded (bucking
magnet) 5 inch doped paper cone woofer with a rubber surround.
Important specs include : Fs 49 Hz, Vas 16 liters, Qms 2.1,
Qes 0.44, Qts 0.36, impedance 9 ohms, 89 dB. A sealed 0.2
cu. ft. box yields an F2 of about 100 Hz.
Since the
main satellites used a Vifa
aluminum tweeter, I decided that at the very least, I would
use a metal tweeter for this speaker. I went with the SEAS
25 TAF/G (H398) from Zalytron. This is a one inch aluminum
dome tweeter rated at 90 dB. Cost was $15.00 USD each on sale.
The crossover
There are
three parts to the circuit - a second order L-R network at
4 kHz, a tweeter attenuator, and an impedance compensation
network for the woofer.

The intended
positioning of the speaker is about 2 inches from the wall
so this is how it was measured during crossover construction.
The tweeter's output measured about 6 dB higher than the woofer.
Using parts on hand, I attenuated the tweeter with two resistors
- a 5.6 ohm in parallel and a 3.3 ohm in series with the tweeter.
Impedance compensation for the woofer consists of an 8 ohm
non-inductive resistor and a 9 mfd capacitor. The second-order
L-R network has a 3.3 mfd capacitor and 0.45 mH inductor for
the tweeter and a 0.5 mH inductor and 3 mfd capacitor for
the woofer. Note that the tweeter is wired in-phase with the
woofer. All resistors are 20 or 25 watt devices; capacitors
are all mylar; and inductors are 19 gauge air core. All parts
are from Madisound
including many from their clearance sales.
If the above
description fails to make sense, I suggest reading Vance Dickason's
Loudspeaker Design Cookbook first. This is an excellent
book on speaker building and is available from various sources
including Audio
Amateur Corporation.
Measured Results
A
Radio
Shack SPL meter was used to measure the resulting in-room
response. This meter really isn't much good beyond 10 kHz
so I measured only from 80 Hz to 10 kHz. The F3 measured at
about 100 Hz. Overall response was +/-3dB from 100 Hz to 10
kHz. In fact, it stayed within +/- 2dB most of the time, with
the exception of the two measurement extremes and a small
dip at about 250 Hz (probably caused by the room).
The box
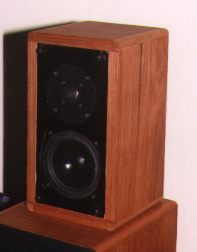 The enclosure
is made of 3/4 inch MDF and is veneered with rosewood on four
sides. The front baffle and the back are painted flat black
and given a gloss clear protective coating. The external dimensions
(in inches) excluding the grill are roughly 7-3/8 wide by
13 tall by 7 deep. Drivers are mounted in recesses on the
baffle with standard particle board square drive screws. Weatherstripping
rope caulk is used to seal the drivers in their mounting areas.
All panels are glued together with yellow carpenter's glue.
Small wood blocks are also glued to the inside corners for
added strength. All internal seams are also caulked. The four
edges where the top/bottom and sides meet are cut off and
replaced with a piece of solid chery. A 1/4 inch roundover
on the cherry softens the edge. The top/bottom/sides are veneered
after assembly. The final finish is Danish oil and wax. The
grill is made from a single piece of 5/8 inch plywood with
most of the center removed. The plywood is first painted flat
black, then the fabric stretched over, stappled and hot glued
to the plywood. Ball and socket fasteners are used to hold
the grill to the baffle. Each speaker has seperate high pass
and low pass crossover boards mounted on either side of the
box. A standard square speaker cup is mounted in the rear.
The enclosure
is made of 3/4 inch MDF and is veneered with rosewood on four
sides. The front baffle and the back are painted flat black
and given a gloss clear protective coating. The external dimensions
(in inches) excluding the grill are roughly 7-3/8 wide by
13 tall by 7 deep. Drivers are mounted in recesses on the
baffle with standard particle board square drive screws. Weatherstripping
rope caulk is used to seal the drivers in their mounting areas.
All panels are glued together with yellow carpenter's glue.
Small wood blocks are also glued to the inside corners for
added strength. All internal seams are also caulked. The four
edges where the top/bottom and sides meet are cut off and
replaced with a piece of solid chery. A 1/4 inch roundover
on the cherry softens the edge. The top/bottom/sides are veneered
after assembly. The final finish is Danish oil and wax. The
grill is made from a single piece of 5/8 inch plywood with
most of the center removed. The plywood is first painted flat
black, then the fabric stretched over, stappled and hot glued
to the plywood. Ball and socket fasteners are used to hold
the grill to the baffle. Each speaker has seperate high pass
and low pass crossover boards mounted on either side of the
box. A standard square speaker cup is mounted in the rear.
 At right is the surround speaker and
it's larger 2-way sibbling.
At right is the surround speaker and
it's larger 2-way sibbling.
The result
Comparing
these speakers to my main satellites, I'm inclined to say
that I like these better. They have less of that "hollow"
sound, have superior imaging and have a less pronounced high
end. Naturally, the low end is lacking but that's part of
the design.
Perhaps
the most enjoyable part of building these speakers is that
I met my original goals. Everything except the inductors were
purchased on sale or taken from my scrap/leftover heap. The
design of the crossover was lots of fun and allowed me to
match theory with reality. The only down side has been the
veneering. The contact adhesive and veneer conditioner have
not met my expectations.
|
|
29-September-2000
Note: The
contents in these pages are provided without any guarantee,
written or implied. Readers are free to use them at their
own risk, for personal use only. No commercial use is allowed
without prior written consent from the author.
|
|
 |