|
 3-Way High Efficiency Speaker
(Lavoce, Dynaudio, Foster 3-way. October-2023)
LCR MTM 3-Channel Speaker
(Three MTM Speakers in One. July-2023)
Mini7bt - A Minimus 7 Portable Bluetooth Speaker
(Minimus 7 and Dayton Audio. Spring-2022)
2-Way Ribbon Tweeter Speakers
(Vifa and Pioneer. May-2020)
Transmission Line Speakers
(Aborted attempt at a TL. September-2012)
Acoustic Research AR-4x Rehab
(Rehab of a garage sale find. January-2016)
Infinity RS-4000 Rehab
(Rehab of a garage sale find. June-2015)
Polaris
(A tall, thin, upwards firing omnidirectional speaker. May-2010)
Shiva_PR15
(A powered subwoofer using a 12" driver and 15" passive radiator. Jan-2010)
Can-Less
(A computer speaker; redux. December-2005)
Can-Can
(A computer speaker in a light canister. Jan-2005)
Sonosub
(10" vented subwoofer in a cardboard tube, powered by a Parapix amp. May-1999)
MTM Center Channel Speaker
(A Madisound design. Nov-1997)
2-way Surround Speakers
(5" woofer and 1" tweeter. July 1997)
3-piece mini system
(6" DVC bass module mated to 4" car speaker. June 1997)
3-way Vented Floorstanding Speaker
(vented 10" woofer, 5" mid and 1" tweeter in a 4
ft tower. Summer 1995)
NHT1259 Subwoofer
(A 12" woofer in a sealed architectural pedestal. Winter 1994-95)
Inexpensive Speaker Stands
(Particle board, sand and spray paint. Fall 1994)
2-way satellite
(6.5" woofer and 1" tweeter. Summer/Fall 1994)
| Audio Electronics Related Projects |
900 MHz Audio Receiver
(Better use for bad headphones. Jan-2008)
Buster - A Simple Guitar Amp
(Perfect for the beginner. Jan-2010)
A PC-based Audio Console
(Use a PC to play tunes. Jan-2010)
LM-12 Amp
(Bridged LM-12 opamps. Aug-2003)
CeeDeePee
(A CD player and FM tuner from spare computer parts. Oct-2002)
Quad 2000 4-Channel Amp
(Premade modules by Marantz. May-1998)
Zen Amp and Bride of Zen Preamp
(by Nelson Pass. Apr-1997)
Using Wood in Speakers FAQ
(Work in progress)
MDF FAQ for speaker builders
Woodworking Tools for the DYIer
(HomeTheaterHiFi.com Oct-1998)
Some Thoughts on Cabinet Finished for DIY Speakers
Large Grills Made Easy
Some Parts Suppliers
(Outdated)
DIY Audio Related URLs
Veneering Primer
(by Keith Lahteine)
How to get a Black Piano Finish
(by DYI Loudspeaker List members)
Sonotube FAQ
(by Gordon McGill)
Excerpts from the Bass List
(Oldies but Goodies)
DIY Loudspeaker List Archives
|
|
Can-Can
A Computer Speaker in a Light Canister
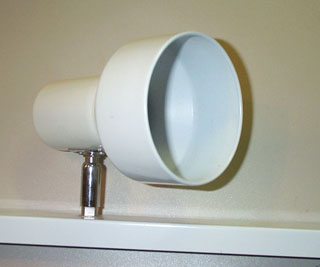
Some time
ago, we installed some cheap overhead lighting in one room
of our house. The light fixture were "track-like"
but without the track - just three canister lights mounted
to a metal bar that's screwed into the ceiling. These were
cheap units in every sense of the word and when I removed
two of them during a room overhaul, various parts fell apart
rendering them useless as lights.
Recently,
I was contemplating mounting a full-range driver into a light
canister mounted inside an armoire. I shelved that project
for another day but decided to see what would happen if I
tried it on a smaller scale in a computer speaker for my office.
 Here are the raw parts - canister light
housing, Aura NS3-193-8A drivers from
Madisound,
and a small surplus JBL multimedia amplifier from
ApexJr.
Here are the raw parts - canister light
housing, Aura NS3-193-8A drivers from
Madisound,
and a small surplus JBL multimedia amplifier from
ApexJr.
|
|
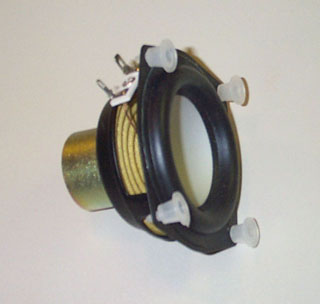
 The drivers arrived well packed in cardboard wrappers
with plastic standoffs to protect the rubber surrounds. The
Aura driver boasts some interesting specs
(PDF file). The 3 inch driver has a very low Fs (80 Hz)
for its size, decent power handling (20W RMS, 80W peak), is
magnetically shielded, and has a large excursion (5 mm Xmax,
20 mm peak to peak max excursion). The potential for equalizing
this driver to achieve a decently flat and wide response is
intriguing. The main drawback is the low efficiency (80 dB
1w/1m) but that's ok given the intended use as a computer
speaker.
The drivers arrived well packed in cardboard wrappers
with plastic standoffs to protect the rubber surrounds. The
Aura driver boasts some interesting specs
(PDF file). The 3 inch driver has a very low Fs (80 Hz)
for its size, decent power handling (20W RMS, 80W peak), is
magnetically shielded, and has a large excursion (5 mm Xmax,
20 mm peak to peak max excursion). The potential for equalizing
this driver to achieve a decently flat and wide response is
intriguing. The main drawback is the low efficiency (80 dB
1w/1m) but that's ok given the intended use as a computer
speaker.
|
|
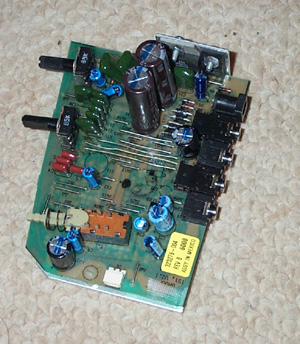
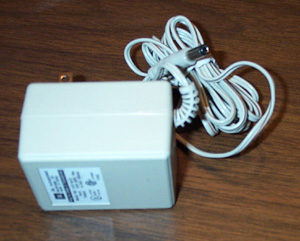 The JBL amplifier is the same one I used on the
CeePeeDee project. I
had a spare unit collecting dust. It uses a TDA7360 amp chip
and has its own wall wart for power.
The JBL amplifier is the same one I used on the
CeePeeDee project. I
had a spare unit collecting dust. It uses a TDA7360 amp chip
and has its own wall wart for power.
|
|
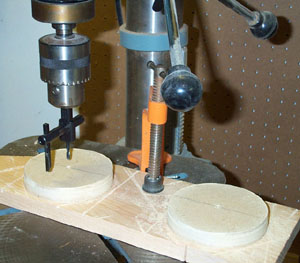
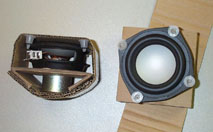
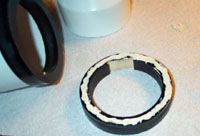
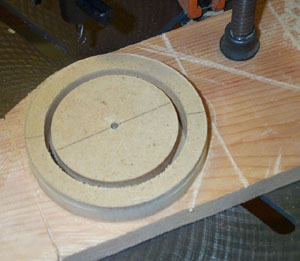 To mount the driver to the white metal housing,
I milled a ring of MDF on a drill press with a fly-cutter.
Each ring was painted black to match the driver's flange.
I cut a small notch in each ring to provide clearance for
the driver's + and - wiring tabs.
To mount the driver to the white metal housing,
I milled a ring of MDF on a drill press with a fly-cutter.
Each ring was painted black to match the driver's flange.
I cut a small notch in each ring to provide clearance for
the driver's + and - wiring tabs.
|
|
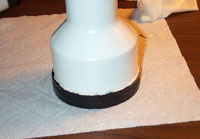
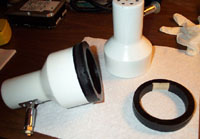 Each ring is glued to the canister with construction
adhesive. The excess is scrapped off the outside after it
has hardened somewhat. The driver is screwed in place with
four sheet metal screws. Driver wiring runs inside the canister
and mounting post.
Each ring is glued to the canister with construction
adhesive. The excess is scrapped off the outside after it
has hardened somewhat. The driver is screwed in place with
four sheet metal screws. Driver wiring runs inside the canister
and mounting post.
No attempt
was made to "design" the enclosure. The internal
volume for the canister is about 0.38 liters, not accounting
for the driver; too small to be of use in any alignment with
these drivers. Since this is for simple computer use, I opted
to just enjoy them as they are. The holes in the rear of the
canister (to let light bulb heat exit) are left as-is.
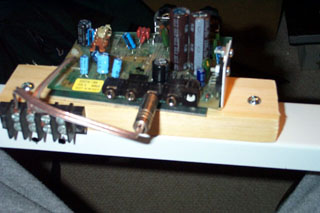 The small amplifier PCB is mounted to the center
of the light fixture assembly (where the third light canister
used to be) on a piece of wood (which acts as an insulator).
I made no attempt to house the amp in anything.
The small amplifier PCB is mounted to the center
of the light fixture assembly (where the third light canister
used to be) on a piece of wood (which acts as an insulator).
I made no attempt to house the amp in anything.
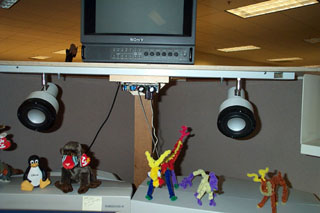
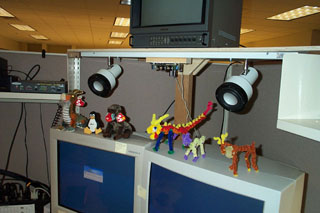 With everything done, I mounted the light assembly
to a shelf over my computer monitors with two bolts.
With everything done, I mounted the light assembly
to a shelf over my computer monitors with two bolts.
Update Jan-13-2005
How do they sound ? They're much better than
the Altec Lansing/Dell multimedia speakers they replaced.
Pointing them downward, they provide better coverage of the
sitting position than desktop speakers. I did some simple
informal A/B listening and everyone liked them better as well.
The main drawback is the lack of power on the amp and low
output voltage on the sound card. The drivers are not all
that efficient but do have loads of excursion. I fed some
60Hz hum and they were able to move some serious amounts of
air. The canisters are very stable. There's enough friction
in the joint to keep the speaker pointing in whatever direction
I want yet still allow me to move them easily and accurately.
My initial
tests showed minimal vibration in the housing. But subsequent
usage showed that the cans not only vibrated a good amount
when the volume was turned up, but the vibration was also
transfered up the supporting joint to the overhead bar. In
the office setup, the vibration continued to the plywood shelf,
then down the center supporting leg to the desktop. I could
feel the vibration with my wrist resting on my keyboard.
As luck
would have it, I had to remove the speakers from this setup
so they are now sitting about collecting dust. When I get
the chance, I'll try applying EQ to see how flat and low a
response I can get. I'll also try filling the bar with clay
to help deaden it.
13-January-2005
Note: The
contents in these pages are provided without any guarantee,
written or implied. Readers are free to use them at their
own risk, for personal use only. No commercial use is allowed
without prior written consent from the author.
|
|
 |