|
Polaris - a 2-way Omni-directional Speakers
Introduction


 I must be a pack rat. I always seem to have parts left over from some previous project, or have parts bought from some sale that caught my eye. Usually, I have a vague idea of how I'll use these parts. What's missing is always the time to actually build the thing. The Polaris speakers are such creatures. In case anyone reading this is wondering, the side view of this speaker,with its top mounted tweeter, bears some resemblance to the Polaris missile; hence the name.
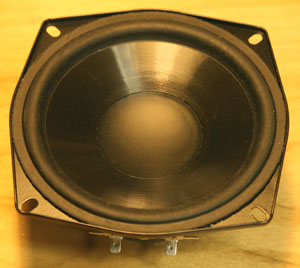
Some time ago, I picked up four Peerless 5 inch mid-bass drivers. (Here's a PDF of the spec sheet.) I don't recall where they came from; just that the spec sheet reflected a decent F3 in a sealed box for a relatively small driver. I don't recall what I had in mind when I bought them but there they were, on my shelf of spare parts. Recently I used one of them with a Lineaum monopole driver (another spare part), to build Buster - a small guitar amp/cab. This worked rather well and made me re-visit my parts collection to see what else I could make.
As luck would have it, my sister wanted to get some speakers for her apartment; and so Polaris was born. But first, I need to quickly explain why these speakers are the way they are.
 Among my spare parts are a pair of Lineaum dipole tweeters (PDF of spec sheet from Radio Shack). These came from Radio Shack during their clearance/closeout sale many years ago. I had planned on using them where their dipole nature would shine the most - as surround speakers. But I never got around to it. Another thought I once had was to build an open baffle speaker. Lastly I also wanted a speaker with sleek dimentions to be more apartment friendly. Combined, these thoughts led me to the Polaris design. Among my spare parts are a pair of Lineaum dipole tweeters (PDF of spec sheet from Radio Shack). These came from Radio Shack during their clearance/closeout sale many years ago. I had planned on using them where their dipole nature would shine the most - as surround speakers. But I never got around to it. Another thought I once had was to build an open baffle speaker. Lastly I also wanted a speaker with sleek dimentions to be more apartment friendly. Combined, these thoughts led me to the Polaris design.
When I looked at the response of the Peerless woofer, there were irregularities I didn't like. But if I looked at it off-axis, it wasn't so bad. Many years ago, I had listened to some Allison top firing cubes and was impressed by the sound. Maybe this topology was the answer I was looking for. By aiming the woofer upwards, I can avoid the more "beamed" part of the response and also get more of an omni-directional sound which would work well with the Lineaum dipole. A quick mockup proved that the sound was quite pleasant. The upper end of the Lineaum is not that great and the overall response is not very flat but what mattered was that it sounded good. The low end was lacking but that's to be expected from a 5 inch woofer. And for apartment living, it's ok to keep the bass subdued and not bother the neighbors. It all works well together. Best of all, this type of speaker would work well in my sister's apartment due to its size and potential speaker placement (away from the wall).
The crossover
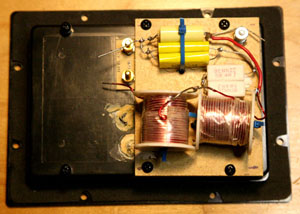
 The next logical step was to design a rough shape, create a baffle and design the crossover. I started with some parts borrowed from the Buster design. I used a Zobel to tame the rising high end. The tweeter has a built-in 5uF non-polar electrolytic capacitor and a measured high pass corner of about 5 KHz. I opted to keep this as-is. I used a second order electrical filter consisting of a 0.37 mH inductor and 2.66 uF capacitor. For the actual implementation, I used two series inductors and two parallel capacitors to make up these values. The resulting low pass section has roughly a 5 KHz corner. The next logical step was to design a rough shape, create a baffle and design the crossover. I started with some parts borrowed from the Buster design. I used a Zobel to tame the rising high end. The tweeter has a built-in 5uF non-polar electrolytic capacitor and a measured high pass corner of about 5 KHz. I opted to keep this as-is. I used a second order electrical filter consisting of a 0.37 mH inductor and 2.66 uF capacitor. For the actual implementation, I used two series inductors and two parallel capacitors to make up these values. The resulting low pass section has roughly a 5 KHz corner.
I built the crossover using a terminal "cup" from an old set of MK speakers. The "cup" is not really a cup; it's much too large. It used to hold the MK crossover so that's what I did too. The passive components all came from my parts box. The inductors and resistors are from MK speakers, and the caps are cheap mylar part from a Madisound clearance sale. Again, nothing to write home about but they work.
The Box
 The physical design of the Polaris is simple in concept but difficult to execute. In fact I took some shortcuts that resulted in less-than-perfect construction; just so that I could at least finish the box in a reasonable amount of time. If I were to do it again, I would definitely make changes to make it better. The physical design of the Polaris is simple in concept but difficult to execute. In fact I took some shortcuts that resulted in less-than-perfect construction; just so that I could at least finish the box in a reasonable amount of time. If I were to do it again, I would definitely make changes to make it better.
Footprint size is important but so is stability. I wanted the speaker to be tall enough so that when standing, the listener is still listening to more of the off-axis sound. But I didn't want to make it too tall to affect listening from a seated position. I eventually settled on 36 inches for the woofer with the tweeter perched above it. I actually wanted more height but I was concerned with stability.
To keep it stable, the lower third of the box is filled with 17 pounds of sand. When finished, each speaker weighed in at 36.6 pounds - light enough to carry but stable enough not to tip over at the slightest bump. I also gave each speaker a 10 x 10 inch bottom pad for stability while retaining the slender body look.
The four sides of the tower are 1/2 inch MDF. The top and bottom are 3/4 inch MDF. The sides continue up to the tweeter, supporting it with four angled supports. No, this is not particularly strong and I debated long and hard on various ways to strengthening this part of the box. In the end, I decided to leave as-is and see how well it holds over time. Internally, the box is divided into four uneven compartments. The bottom compartment is sand filled. The dividers between the other compartments have holes to account for air movement. Various strips of MDF are used to stiffen and separate the walls and dividers. Caulk is applied to all seams to create a fully sealed box. There is no stuffing.
Overall, the box is fairly simple with butt joints; yet it is strong and dead. Cablings runs through the interior from the crossover to the top. The tweeter cable exits via a small hole (caulked) in the rear.
Here are some dimensions:
- External dimensions of main box: 36 inch high, 7 inch wide, 5-3/8 inch deep.
- Top baffle: 6 x 6 inch, 3/4 inch thick.
- Distance from top baffle to bottom of tweeter unit: 5-1/2 inches
- Base: 10 x 10 inch plus wood trim
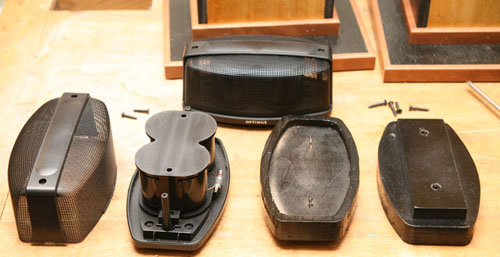
 The tweeter unit is actually 4 pieces - there's the tweeter itself, a piece of plywood to support the tweeter, a ring that separates these two pieces, and a piece of MDF to act as a spacer during mounting. Due to the odd shape of the tweeter, the ring and mounting plate were cut by hand on a bandsaw - not the best cutting job but I wasn't all that concerned. My origial intent was to somehow hide the wiring to the tweeter. The "somehow" part became too complex so I punted that goal and made life simpler. I added a two terminal euro style connected on the rear of the tweeter assembly and used that to externally connect the tweeter to the crossover inside the main box. Again, not the prettiest thing but it works. The tweeter unit is actually 4 pieces - there's the tweeter itself, a piece of plywood to support the tweeter, a ring that separates these two pieces, and a piece of MDF to act as a spacer during mounting. Due to the odd shape of the tweeter, the ring and mounting plate were cut by hand on a bandsaw - not the best cutting job but I wasn't all that concerned. My origial intent was to somehow hide the wiring to the tweeter. The "somehow" part became too complex so I punted that goal and made life simpler. I added a two terminal euro style connected on the rear of the tweeter assembly and used that to externally connect the tweeter to the crossover inside the main box. Again, not the prettiest thing but it works.
The woofer is surface mounted - I didn't bother recessing it into the top baffle to keep contruction simple.
I had some issues gluing the panels together and they did not come out as well as I wanted. I wanted to veneer the cabinet but without a perfect surface (where the sides meet the front and back), the veneer would buckle. Plan B took hold. I veneered the front and back, while painting the sides. Again, this is not exactly what I wanted but it'll do for now.
The 10 x 10 baes is made from oak plywood, spray painted black and screwed through the bottom. The screw actually reaches the sand chamber so if these are ever removed, the holes need to be sealed. The banding at the base is just off-the-shelf moulding my friend gave me.
The result
One nice feature of this speaker is that there really isn't a front or rear. Well, there is if you consider the placement of the bindng posts but from a listening perspective, the speakers sound good from any direction. My wife prefers them over the little surround speakers I'm using in my living room as she likes room-filling ambience type sound - just where an omni speaker would excel. I did a little recreational listening with some Beethoven, Boston Pops and Tchaikovsky. The lack of a full high end made these speakers quite comfortable - not tiring at all. The lack of decent bass was very apparent too. The tweeter could probably be padded down a little but I don't think it's worth the tweaking. I think a little bass boost from a stereo receiver's tone control is all that's needed.
I could have done a better job during the construction phase but it is what it is; at least for now. Perhaps in the future, I can redeem myself and build it better. Right now, I want to put them into service and enjoy their sound.
Below are additional images; click on the icon to see a larger vesion of the picture in a separate browser window. |