|
A PC-based Audio
Console
Introduction
Some things
in life just take longer than they should. I started this
project quite a while ago when I picked up a FlexATX motherboard
from an internet surplus dealer. The concept was simple. Build
an extremely cheap computer, make it as compact as possible,
treat it like a console device (like a CD player for instance),
place my entire music collection on a hard disk in MP3 format,
and place the unit in the bedroom so I can listen to my favorite
tunes.
From the
outset, there were a few obvious challenges. My ideal box
would be standalone; it would not require a TV or monitor
for video output. Ideally, it wouldn't need a keyboard either
since those take up too much space. It had to have built-in
amplifiers so that I wouldn't need a seperate stereo amplifier.
And it had to boot quickly and be silent. And let's not forget
that it had to be dirt cheap.
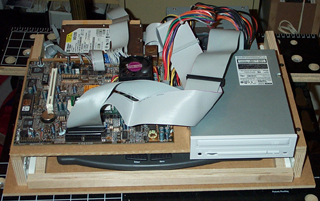
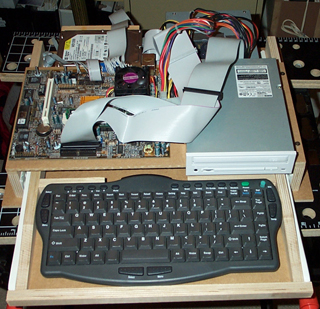 As luck would have it, I just didn't have the time to work on this
thing. When I finally made some headway in early 2004, the
results were dissapointing. Here
are two pictures of what I came up with; one with the drawer closed and the other
with the drawer open. I liked the drawer idea for the keyboard
but the entire case was just too bulky. Not shown is the rest
of the box, which rose a few more inches to enclose all the
hardware. Made of MDF, the case was heavy and ugly. The straw
that broke the camel's back was the hum in the amplifiers
I installed (also not shown). Back to the drawing board.
As luck would have it, I just didn't have the time to work on this
thing. When I finally made some headway in early 2004, the
results were dissapointing. Here
are two pictures of what I came up with; one with the drawer closed and the other
with the drawer open. I liked the drawer idea for the keyboard
but the entire case was just too bulky. Not shown is the rest
of the box, which rose a few more inches to enclose all the
hardware. Made of MDF, the case was heavy and ugly. The straw
that broke the camel's back was the hum in the amplifiers
I installed (also not shown). Back to the drawing board.
New life for an old VCR
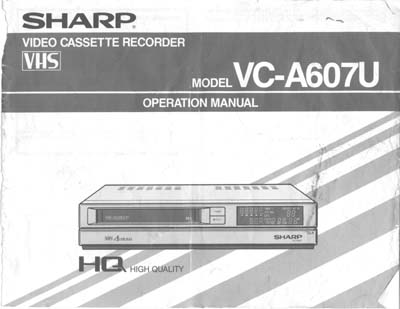 If there's one nice thing about old VCRs, it's that they are
fairly deep. I had a 15 year old Sharp VC-A607U whose belts
finally bid farewell last year. A little measuring confirmed
that I could fit my FlexATX system into this plastic case
if I was willing to strip my system requirements to the barebones.
Given how long I'd spent on this project (I hate having stuff
sitting about half-finished) any compromise seemed like a
good idea.
If there's one nice thing about old VCRs, it's that they are
fairly deep. I had a 15 year old Sharp VC-A607U whose belts
finally bid farewell last year. A little measuring confirmed
that I could fit my FlexATX system into this plastic case
if I was willing to strip my system requirements to the barebones.
Given how long I'd spent on this project (I hate having stuff
sitting about half-finished) any compromise seemed like a
good idea.
The new
console will start out as nothing more than a computer. It'll
have a single hard disk, a power supply and motherboard. The
keyboard is wireless (infrared) so it's not tethered to the
box. That's pretty much it ! Anything else I may add to the
box will depend entirely on the available space in the box.
For expansion, there will be at least one exposed USB connection
for either a wireless network adapter or mass storage device.
Of course,
the entire unit needs to be cheap; otherwise I'd just buy
an iPod and be done ! The simple truth is that the single
most expensive item here should be the hard disk drives. Everything
else is either recycled, taken from my spare parts bin, old/used
"stuff" or obtained at a steep discount. Here's
the bill of materials.
|
ECS
P6STP-FN Motherboard; includes the wireless keyboard |
$30;
New, from www.package2you.com |
|
Intel
Pentium 3, 800 MHz CPU.
133MHz FSB |
$0;
Recycled from an old defunct Compaq Proliant server my
former employer was tossing into the dumpster |
|
Netgear
MA111 v2 USB Wifi adapter |
$5;
New, price after rebate from www.compusa.com |
| Heatsink
and 2 fans |
$0;
Used, from my spare parts bin |
|
PNY
128 Mb and 64Mb PC133 memory (total of 196 Mb) |
$0;
New, free-after-rebate from CompUSA and Staples. From
my spare parts bin. |
|
Seagate
120 GB hard disk |
$50;
New, price after rebate from Best
Buy |
| case |
$0;
Recycled dead Sharp VC-A607U VCR |
|
Cirque
Glidepoint serial mouse and cables |
$0;
Used, from my spare parts bin |
| Mitsuko
300W ATX Power supply |
$0;
Used, from my spare parts bin |
| 4-in-1
USB adapter |
$6;
New, from www.compgeeks.com |
The total
cost comes out to about $91, not counting miscellaneous hardware.
Now for a quick look at the guts of this system.
The Motherboard
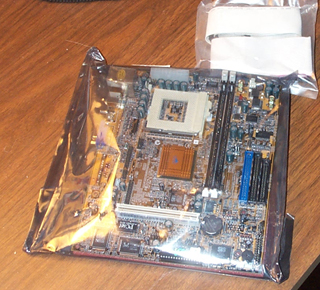
 The ECS motherboard I'm using has several features that
made it an ideal candidate for my console. It has a built-in
wireless keyboard interface so there's no umbilical cord dragging
about a keyboard. The FlexATX form factor is smaller than
microATX through bigger than mini-ITX. The price was great,
especially since it included the mid-sized keyboard. Since
I don't meed a lot of CPU power, a socket-370 processor gives
me lower power dissipation and therefore less fan noise than
a faster more modern CPU. Integrated graphics, network and
sound removes the need for add-in cards thus keeping the height
down to a minimum. The TV-out feature means I can drive a
standard television and don't need a computer monitor - perfect
for use next to a TV. In short, I couldn't ask for a more
suitable motherboard for the money.
The ECS motherboard I'm using has several features that
made it an ideal candidate for my console. It has a built-in
wireless keyboard interface so there's no umbilical cord dragging
about a keyboard. The FlexATX form factor is smaller than
microATX through bigger than mini-ITX. The price was great,
especially since it included the mid-sized keyboard. Since
I don't meed a lot of CPU power, a socket-370 processor gives
me lower power dissipation and therefore less fan noise than
a faster more modern CPU. Integrated graphics, network and
sound removes the need for add-in cards thus keeping the height
down to a minimum. The TV-out feature means I can drive a
standard television and don't need a computer monitor - perfect
for use next to a TV. In short, I couldn't ask for a more
suitable motherboard for the money.
On the down
side, the particular version of this ECS motherboard didn't
have the audio I/O connectors installed on the motherboard (the audio
chip is there, just no connector)
so I had to wire them up seperately; not that big a deal.
An 800 MHz
(6.0 x 133FSB) CPU is more than enough power for decoding
MP3 files. To reduce power consumption and heat, I can underclock
the processor in the BIOS by running the front side bus at
66 or 100 MHz.
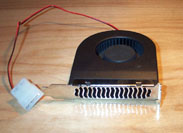
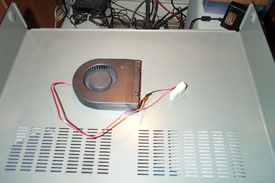 Cooling the CPU requires two parts - a socket-370 heatsink
and a fan. The heatsink is nothing special. The fan is a squirrel
cage slot fan (photo left) with the I/O bracket removed. It
is mounted to the underside of the case lid with double-sided
foam (photo right). The exhaust blows over the disk drive
and the power supply heatsinks. To reduce noise, a 33 ohm
1/2 watt resistor is added to reduce the voltage from 12V
to 8.5V.
Cooling the CPU requires two parts - a socket-370 heatsink
and a fan. The heatsink is nothing special. The fan is a squirrel
cage slot fan (photo left) with the I/O bracket removed. It
is mounted to the underside of the case lid with double-sided
foam (photo right). The exhaust blows over the disk drive
and the power supply heatsinks. To reduce noise, a 33 ohm
1/2 watt resistor is added to reduce the voltage from 12V
to 8.5V.
VCR Case
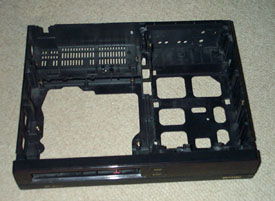
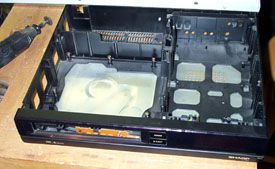 After
gutting the VCR of its internal components (photo left), I
removed most of the plastic obstacles with a Dremel tool (photo
right). The differences in the photos are subtle. The most
obvious change is the removal of a wall 2/3 of the way back
on the left half of the box. I left some of the plastic in
place to help stiffen the box. The resulting unit contained
two basic areas. The motherboard sits on the left and towards
the front. I would have liked to push it back further but
it just didn't fit that well back there. Furthermore, the
ATX power cable would be trickier to install without removing
more of the plastic ribbing. The power supply and disk drive
sit on the right side.
After
gutting the VCR of its internal components (photo left), I
removed most of the plastic obstacles with a Dremel tool (photo
right). The differences in the photos are subtle. The most
obvious change is the removal of a wall 2/3 of the way back
on the left half of the box. I left some of the plastic in
place to help stiffen the box. The resulting unit contained
two basic areas. The motherboard sits on the left and towards
the front. I would have liked to push it back further but
it just didn't fit that well back there. Furthermore, the
ATX power cable would be trickier to install without removing
more of the plastic ribbing. The power supply and disk drive
sit on the right side.
 On the front, I mounted a push-button on/off switch behind the flip-down
access panel.
On the front, I mounted a push-button on/off switch behind the flip-down
access panel.
Inside,
I mounted a green power-on LED and the IR keyboard sensor.
The original
door for the VHS tape well has not been installed yet. This
gives me easy access to the secondary IDE connector which
I still need to hook up a CD-ROM drive - it's still the easiest
way to get data on and off the unit.
Power Supply
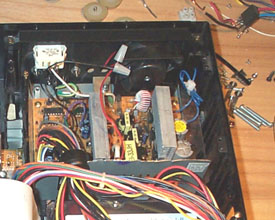 Over the years, I've collected a number of ATX power supplies.
Frankly, I don't even remember where each one came from. I
picked one that had enough empty space that I could cut about
3/4 inch off the sides of the sheet metal. I relocated the
output cable bundle down in the new shorter housing.
Over the years, I've collected a number of ATX power supplies.
Frankly, I don't even remember where each one came from. I
picked one that had enough empty space that I could cut about
3/4 inch off the sides of the sheet metal. I relocated the
output cable bundle down in the new shorter housing.
A 60 mm
Panaflow fan replaced the original 80mm unit. The fan is mounted
with two screws and seperated from the plastic case by Mortite
weatherstriping caulk. To further reduce noise, a 50 ohm,
12 watt pot is installed on the rear panel to give me control
over the fan speed. Maximum attenuation would yield a voltage
of only 6.2V instead of the normal 12V.
The original
power supply had a 115V/230V switch. It is now hardwired to
115VAC. An input IEC 3-prong power connector and switch are
added to the back panel.
Disk Drive
The single
3-1/2 inch disk drive is mounted on two wooden slats. The
slats are then mounted to the bottom of the case. This is
a lot easier than trying to align screws from the bottom of
the chassis directly into the disk drive. A small rubber grommet
isolates the drive from the wood slat at each screw to reduce
vibration transmission.
Assembly
The motherboard
rests on several raised plastic supports. These were originally
used to support the VCR's PCBs. I used a Dremel to level these
posts to the same height. Only two screws hold the motherboard
in place.
The power
supply is held in place with three small bolts.

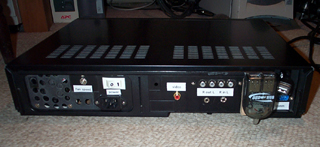
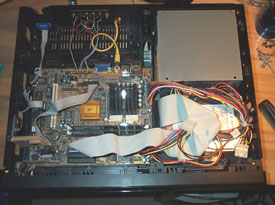 In the rear panel, audio line-in and line-out connectors are
mounted (photo left). Both 1/8 inch stereo and RCA connectors
are used. I wanted the option of using a Cirque Glidepad instead
of that little rubber eraser mouse on the keyboard so I installed
a 9-pin serial connector to a header on the motherboard. This
required re-working a ribbon cable. Finally, a single RCA
jack provides NTSC video output. There is no VGA connector.
The photo on the right shows the final layout of the three
main parts - motherboard, power supply and hard disk drive.
In the rear panel, audio line-in and line-out connectors are
mounted (photo left). Both 1/8 inch stereo and RCA connectors
are used. I wanted the option of using a Cirque Glidepad instead
of that little rubber eraser mouse on the keyboard so I installed
a 9-pin serial connector to a header on the motherboard. This
required re-working a ribbon cable. Finally, a single RCA
jack provides NTSC video output. There is no VGA connector.
The photo on the right shows the final layout of the three
main parts - motherboard, power supply and hard disk drive.
USB
With the
main computer built, I turned my attention to expansion capabilities.
With the limitations imposed by the size of the box and the
motherboard used, my only option was USB. For networking,
I used a Netgear WiFi USB dongle. Any other expansion needs
would be attached via a 4-in-1 USB hub. The hub is glued to
the rear of the unit with double sided sticky foam. Cables
for both the hub and the WiFi dongle are coiled and left inside
the chassis.
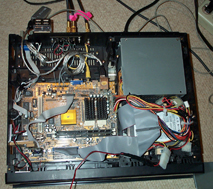
 The picture on the left shows the addition of the USB
cables towards the top of the picture. The picture on the
right shows the position of the USB hub on the back panel
with ports facing up.
The picture on the left shows the addition of the USB
cables towards the top of the picture. The picture on the
right shows the position of the USB hub on the back panel
with ports facing up.
|